ECOPLATE
The classic plate reverb plugin. We modeled the original Ecoplate I plate reverb with precision and care to deliver authentic true-to-life sound. Then we took the original interface and made it better, adding functionality through a simple, clean design with modern features. Download your free trial today.
“HEAR360 has absolutely delivered on reviving this classic unit.”
Specifications
A wide, robust, and luxurious plate reverb plugin that allows engineers and producers access to the original Ecoplate I in the convenience of their own studios without having to acquire a hard-to-find and bulky analog unit.
New software-only features are included in the design such as pre-delay with tempo sync, low-pass & high-pass filters, and an analog model profile including Ecoplate’s original noise floor along with an added saturation control.
Modeled for use with high-resolution content, use Ecoplate natively at sample rates up to 192k.
Available in AAX, VST3, and AU plugin formats for Mac with 64 bit and M1+ ARM support. AAX and VST3 formats available for Windows.
What everyone is saying:
“The Ecoplate plugin is an accurate representation of a product that I’ve loved and used on countless projects over the years. In addition to the spot-on reproduction, the GUI gives creatives the perfect toolset to tweak parameters that previously would have to be added to the signal chain. Well done!”
“Never have I ever been so consistently satisfied by any one plugin as I have been since I started using this one.”
Decay
Reverb tail lengths from 1 to 12 seconds (this unit actually produces over 12 seconds of decay at its max setting).
Just like the original hardware, move the lever to the left or to the right to change the reverb decay time. The numbers correspond to seconds in time.
Type in a value in the “Reverb Time Scale’ box, or use the “-“ “+” buttons to lengthen or shorten the decay time.
Input & Output Gain Control and Metering
Slide the input and/or output levers to the right or to the left to boost or attenuate the gain of the input and output signals. The input gain adjusts the incoming audio before the reverb engine. The output control adjusts the full signal including reverberation.
Use the VU meter in the middle to see the input or output signal strength.
Use the green meter at the input slider to see the gain of the input signal. Use the red meter to see the output.
Low-Pass & High-Pass Filters
Adjust the frequency bandwidth of the input and/or output signal.
Use the Low-Pass knob to filter the amount of the frequency bandwidth of the input (pre reverb) or output signal (post reverb).
Use the High-Pass knob to adjust the amount of the frequency bandwidth of the (pre reverb) or output signal (post reverb).
Hover over and click on the Low or High-Pass PRE or POST text to choose between filtering the input or output signal. When selecting Pre it will filter the dry signal and when selecting Post it will filter the reverberated signal. As an example, this feature allows you to roll off the top end on your input, but maintain the air and full bandwidth of the reverb, creating a more open soundscape, while only reverberating the frequencies you want.
Pre-delay
Control the timing of when the reverb starts by choosing the amount of delay between the dry and wet signal.
With the Pre-Delay knob, you can adjust the delay time in milliseconds. By manipulating the delay time before the reverb, you can open up space and add clarity to your mix. The further you turn the knob to the right the later the reverb starts in time.
Sync To Tempo allows you to adjust the pre-delay with musical notes, synchronized with your DAW session’s BPM and tempo settings.
Additional Settings Menu
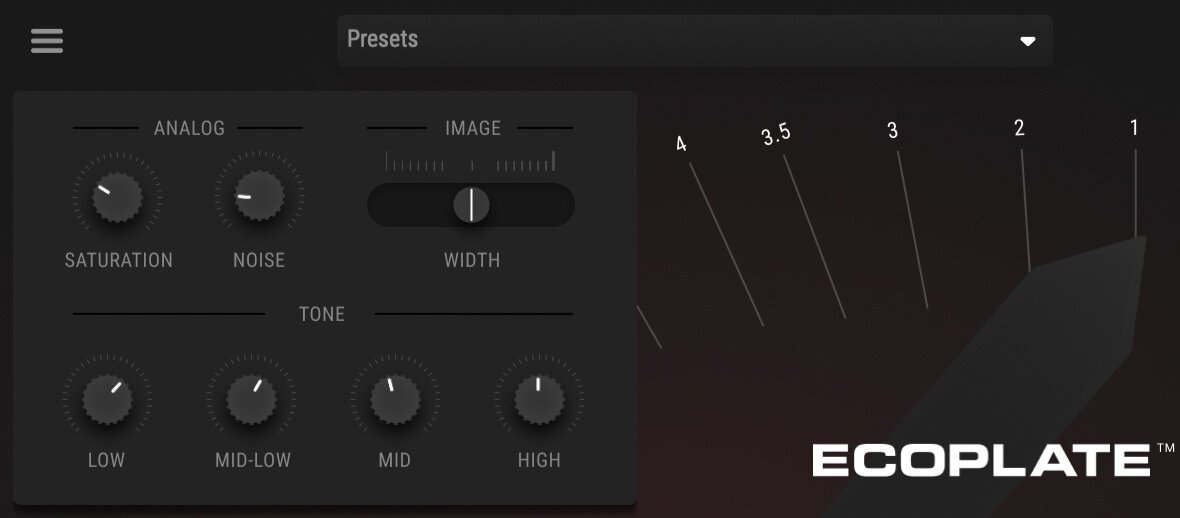
Find your perfect sound for any track. Inside the additional setting menu you can manipulate tone, analog noise level, analog saturation, and stereo width. Fatten up your bottom end, or fine tune your stereo image to match the personality of your session.
Reverb Level Control
When using an aux return for Ecoplate, you may want a 100% reverb level, but when using Ecoplate directly on an instrument, we have provided 2 ways to control your reverb levels with precision. A mix wet percentage is available as a standard option, but when you don’t want your carefully mixed instrument volume to change when manipulating reverb ratios, you can switch over to LVL mode. In LVL mode, your tracks input volume never changes, and the LVL knob acts as a reverb level control, so your mix stays where you want it, and you can get results faster and more precisely.
Analog
With the analog switch, you can turn on Ecoplate’s noise profile which reproduces the sound of the actual Ecoplate hardware noise.
As a custom modification, we also added an input tube saturation stage to the plugin that was not available on the original Ecoplate hardware units.
Turn on the Analog switch for a vintage vibe and added color, or turn it off and keep an ultra-clean signal path.
Original hardware Ecoplate frequency response
Read up on Ecoplate:
Watch Warren Huart in his Ultimate Plugin Review video and win 1 of 3 Ecoplate Plugins on the Produce Like A Pro Blog
See what Sven-Erik Seaholm has to say Ecoplate Plugins in the San Diego Troubadour


